Key Points
- Running pre-meeting checks on video conferencing platforms like Zoom helps you test audio and video clarity, compatibility with devices, and avoid technical delays, ensuring a smoother virtual collaboration experience.
- Regularly update Zoom and use its test meeting feature to adjust audio and video settings as needed. Be sure to check the speaker and microphone levels, select the correct camera, and configure screen-sharing options to suit your collaboration needs.
- Improve user experience during meetings by maintaining a reliable internet connection, closing unnecessary applications to free up bandwidth, using high-quality webcams and headsets, and ensuring a secure network connection.
- Consider using automated room testing from ET Group to make sure your virtual platforms are ready to go before meetings instead of constantly spending time and effort to adjust them.
Video conferencing is a vital communication tool for hybrid workspaces, with many organizations depending on platforms like Zoom, Microsoft Teams, and Google Meet for effective collaboration. Conducting pre-meeting checks on this software is the best way to make sure it’s ready for use by your team members and avoid potential disruptions or delays.
In this article, our team at ET Group guides you through the process of testing platforms like Zoom before meetings begin, and shows you what you can do to keep your collaboration tools ready to go between meetings with less effort.
Why You Need to Test Video Conferencing Platforms Before Meetings
Testing video conferencing platforms prior to meetings is imperative to:
- Ensure Clarity: To make certain that the audio and video are clear and that there are no unexpected distortions.
- Check Compatibility: To verify that the platform is compatible with your device and any peripherals you intend to use.
- Avoid Delays: To prevent any delays due to technical glitches during the actual meeting.
- Ensure Security: To ensure that all security features are activated and working properly.
- Build Confidence: To build confidence that everything is set up properly, reducing anxiety before important calls.
How to Test Zoom Before a Meeting
Zoom is designed for ease of use, but it still has a lot of features and it’s easy to get lost if you don’t know what to focus on. We’ve boiled things down and provided this quick step-by-step guide to adjusting the most important settings—if you’re having trouble in a meeting, this should help you regain control.
Step 1: Update Zoom
Compatibility issues can occur if you’re using an outdated version of your meeting software, so it’s important to know whether you have the latest version of Zoom installed on your device. If you don’t, you can download it from the official Zoom website here.
Step 2: Sign In or Join a Test Meeting
Signing into Zoom and opening up the Preferences menu will bring up a number of different settings menus, including:
- General
- Video
- Audio
- Share Screen
- Background & Effects
- Recording
- Statistics
- Feedback
- Keyboard Shortcuts
- Accessibility
You can also join a test meeting by visiting this page and clicking the button marked ‘Join’. You’ll then be guided through a series of prompts that ask you what you can see and hear based on the different options you select.
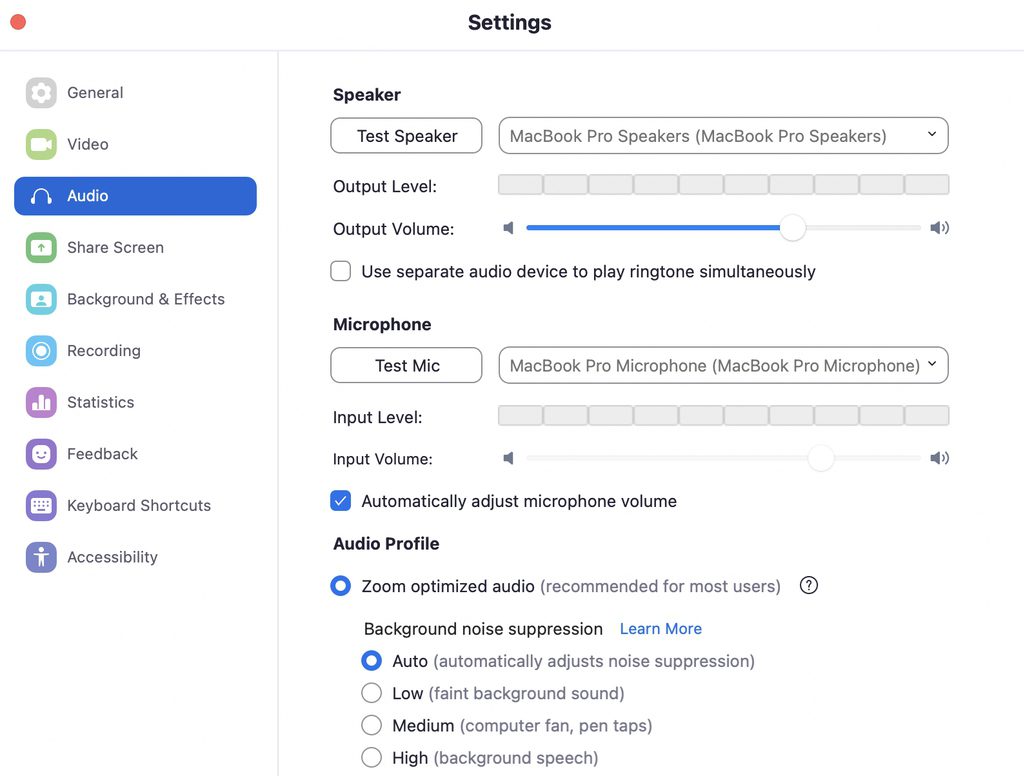
Step 3: Check Audio Settings
When adjusting Zoom’s audio settings, the most important things are to make sure you can hear everyone else and make sure that you can be heard as well. Here’s the easiest way to check:
- Test Speaker: Click ‘Test Speaker’ to ensure that Zoom is using the right device for audio output and that you can hear sound through it clearly.
- Test Microphone: Click this button to begin a short recording using your selected audio input device. Speak into the microphone (or other device) and adjust the volume until the bar under ‘Input Level’ moves—it will appear green if the signal is clear and red if you’re so loud that the audio is peaking (which impacts the quality for other people in your meetings).
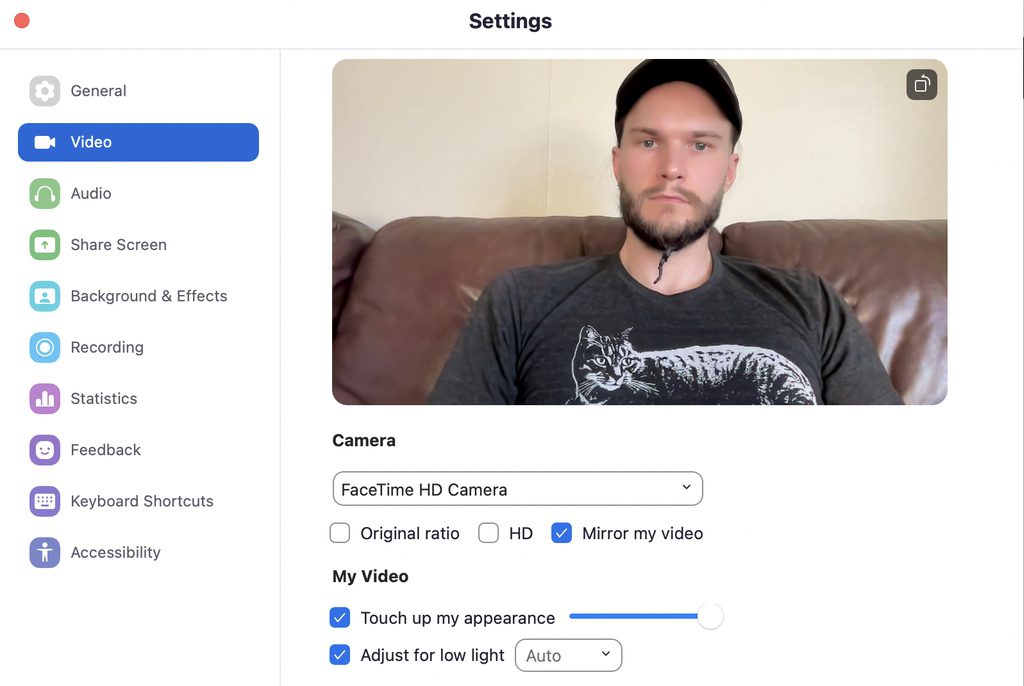
Step 4: Check Video Settings
The video settings tab in Zoom is designed to be pretty simple, but there are a few things you’ll want to be aware of. Here are the steps you’ll want to take to make sure you can be seen and see others:
- Choose Your Input Device: In the “Camera” drop-down menu, select the camera you want to capture you during the meeting.
- Select Your Video Quality: Choose either “Original ratio”, “HD” (for higher quality), or “Mirror my video” (to show other participants exactly what your camera displays to you).
- Enhance Your Video: Select “Touch up my appearance” to have minor blemishes corrected or “Adjust for low light” to make you more visible when joining a meeting from dimmer environments.
Step 5: Test Screen Sharing & Other Features
Navigating to the Share Screen menu provides you with a list of options that determine how other participants see the content you choose to share during meetings. Choosing the correct settings here is important if you’re using Zoom for real-time collaboration at work. Here are some of the key features you should check:
- Window size for screen sharing: Choose whether shared content scales to fit the Zoom window in various sizes, or enable side-by-side mode to place it next to participants.
- Share applications: Choose whether to share a specific window when sharing from an application or share all windows with other participants.
- Sharing your screen during meetings: Choose whether Zoom defaults to sharing your entire desktop or provides you with a list of options every time you share your screen.
- Sharing directly to a Zoom room: Choose whether Zoom shares your entire screen by default when you share your screen with a breakout room or whether it presents you with different options first.
Testing on Other Video Platforms
Most virtual meeting platforms are designed enough like Zoom that you can follow a pretty similar process to check their essential settings. Here’s a quick checklist for doing it with some other popular meeting tools:
Microsoft Teams
- Go to ‘Settings’ > ‘Devices’ to check your microphone, speakers, and camera.
- Under Audio devices, choose the default speaker and mic you want Teams to use.
- Under Camera, choose the camera you want Teams to use. You’ll be able to view a preview so that you can see what others will see during meetings.
- Use the ‘Make a Test Call’ feature under ‘Settings’ > ‘Devices’.
Google Meet
- Use Google Meet’s “green room self-check” feature to test your audio and video before meetings.
- Select the meeting you want to join—but before clicking “Join”, check the preview tile that appears.
- You’ll see symbols representing your speaker, mic, and camera below your video preview. Adjust these as necessary before clicking “Join”.
Best Practices for Hardware & Network Settings
Ensuring that your hardware and network settings are properly configured is essential for a smooth video conferencing experience. Here are some best practices to follow:
- Ensure your internet connection is reliable and fast enough to handle video conferencing.
- Close any unnecessary applications or browser tabs that might be using up bandwidth.
- Ensure your computer, tablet, or smartphone meets the minimum system requirements for the video conferencing platform you are using.
- Use a high-quality webcam for better video clarity.
- Employ a headset with a microphone for clearer audio, as built-in microphones can sometimes pick up background noise.
- Position your camera at eye level and ensure your face is well-lit, but avoid harsh lighting.
- Choose a clean, uncluttered background or use a virtual background.
- If using external devices such as a webcam, microphone, or speakers, ensure they are compatible with your computer and the video conferencing platform.
- If you are discussing confidential information, make sure your network connection is secure.
- Use a Virtual Private Network (VPN) if you are connecting from a public Wi-Fi network.
The Value of Automated Room Testing
It’s important to remember that the above is a broad-strokes overview of how to check the most important settings in Zoom and other virtual meeting platforms. Covering every single option in all of these platforms would take more room than we have time for here—but even testing all of the above before each meeting can be time-consuming and a lot of work for your team members.
Automated room testing solves these problems by checking the settings for all the devices and meeting platforms in your hybrid environment and restoring them to your preferred options between meetings. ET Group can provide this service to save time and effort for you and your team, allowing you to join every meeting with confidence that you’ll be able to communicate and collaborate clearly.
Use the information above to orient yourself with your preferred meeting software and adjust the most important settings—but reach out to our team for help setting up a hybrid environment that’s always ready to support your team when you need it. For more info, check out the FAQ below:
Frequently Asked Questions about Testing Zoom
Why can’t others see me on Zoom?
Make sure the box marked “Stop my video when joining a meeting” is unchecked.
Why can’t I see myself on Zoom?
Make sure the “Hide Self View” box is unchecked.
Can I get rid of background noise during Zoom meetings?
Yes—go to Preferences, click Audio, and choose one of the following options under “Background noise suppression”:
- Auto (adjusts intuitively based on ambient noise)
- Low (for faint or distant sounds in the background)
- Medium (like your computer’s fan or pens tapping on desks)
- High (like cross-talk or ambient music in your workspace)
Why can’t others hear me in Zoom meetings?
Check the box marked “Automatically join computer audio when joining a meeting” and make sure the box marked “Mute my mic when joining a meeting” is unchecked.
Stay connected with us:
Follow ET Group on LinkedIn
Follow us on Twitter
Subscribe to ET Group’s YouTube Channel


